简介
利用Gitlab、Gitlab-runner,实现代码托管与持续集成。
环境安装
安装Gitlab及其所依赖的服务程序
依赖服务程序安装
1 | # yum install -y curl policycoreutils-python openssh-server cronie postfix lokkit |
安装Gitlab
1 | # curl https://packages.gitlab.com/install/repositories/gitlab/gitlab-ee/script.rpm.sh | sudo bash |
安装Gitlab-runner
1 | # curl -L https://packages.gitlab.com/install/repositories/runner/gitlab-runner/script.rpm.sh | sudo bash |
相关配置
配置访问地址
在安装步骤中EXTERNAL_URL="Yourhost" yum -y install gitlab-ee,其中EXTERNAL_URL代表未来访问Gitlab服务的url地址,如果需要更换,可修改/etc/gitlab/gitlab.rb文件,找到以下位置并修改external_url属性:1
2
3
4
5
6## GitLab URL
##! URL on which GitLab will be reachable.
##! For more details on configuring external_url see:
##! https://docs.gitlab.com/omnibus/settings/configuration.html#configuring-the-external-url-for-gitlab
#external_url 'example.gitlab.com'
external_url 'http://ipaddr'
如果你想通过域名进行访问,需要自行绑定域名。若在局域网内,需要自己搭建DNS服务器,详细可参考自建DNS服务器
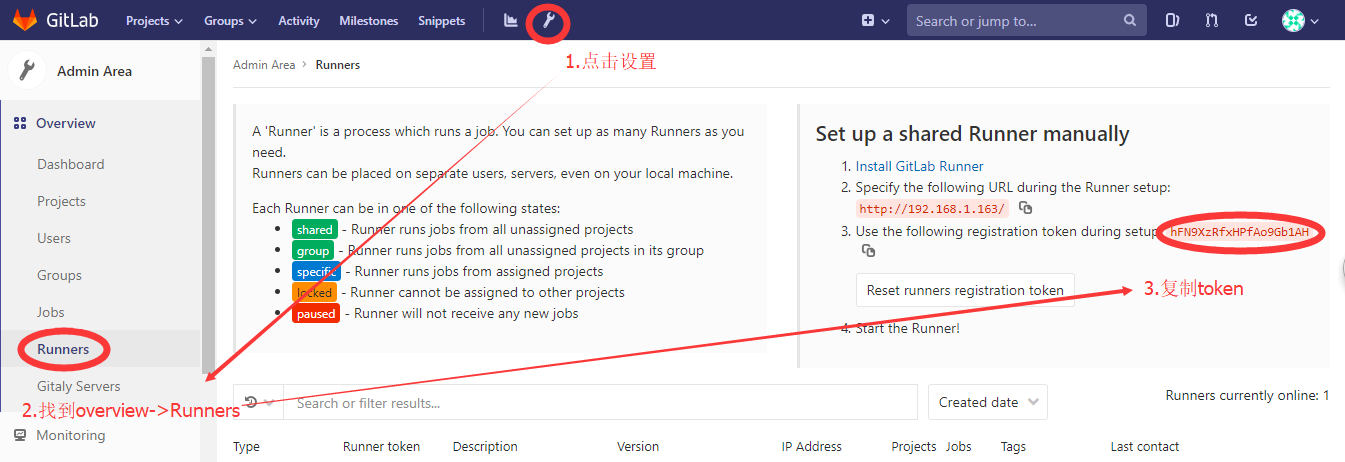
注册runner
在使用runner前,需要先注册一个runner:1
# gitlab-runner register
执行后,进入对话,填写相应信息1
2
3
4
5
6
7
8
9
10
11
12
13
14
15
16
17
18Running in system-mode.
Please enter the gitlab-ci coordinator URL (e.g. https://gitlab.com/):
http://192.168.1.163/
Please enter the gitlab-ci token for this runner:
hFN9XzRfxHPfAo9Gb1AH
Please enter the gitlab-ci description for this runner:
[Jenkins]: 测试
Please enter the gitlab-ci tags for this runner (comma separated):
build,test
Whether to run untagged builds [true/false]:
[false]:
Whether to lock Runner to current project [true/false]:
[false]:
Registering runner... succeeded runner=hFN9XzRf
Please enter the executor: docker+machine, docker-ssh+machine, docker, parallels, ssh, kubernetes, docker-ssh, shell, virtualbox:
shell
Runner registered successfully. Feel free to start it, but if it's running already the config should be automatically reloaded!
对话信息说明
Please enter the gitlab-ci coordinator URL (e.g. https://gitlab.com/):
输入gitlab-ci的通讯url,用以在runner运行期进行管道通讯。在gitlab客户端界面获取此通讯url并填写到对话中:

Please enter the gitlab-ci token for this runner:
输入gitlab-ci的通讯认证token,在gitlab客户端界面获取认证token并填写到对话中:
Please enter the gitlab-ci description for this runner:
对此runner的描述、简介
Please enter the gitlab-ci tags for this runner (comma separated):
我的理解是,为runner进行分组,以便对job的运行进行管理。以下是官方的说明:
You must set up a Runner to be able to run all the different types of jobs that > it may encounter on the projects it’s shared over. This would be problematic > for large amounts of projects, if it wasn’t for tags.
By tagging a Runner for the types of jobs it can handle, you can make sure > shared Runners will only run the jobs they are equipped to run.
For instance, at GitLab we have Runners tagged with “rails” if they contain the > appropriate dependencies to run Rails test suites.
Whether to run untagged builds [true/false]:
如果此runner中的tag,不存在于某个job的tags属性中,是否允许执行此job。默认为false,也就是说如果我们使用这个runner,那么在添加job的时候,需要在tags中添加build或test,否则将不会执行。
Whether to lock Runner to current project [true/false]:
我的理解是, 若job已被触发,则此runner是否只对当前项目有效 。
Please enter the executor: docker+machine, docker-ssh+machine, docker, parallels, ssh, kubernetes, docker-ssh, shell, virtualbox:
为当前runner选择一个执行器。
通过配置文件修改runner
若在配置过程中出现偏差,可通过编辑配置文件/etc/gitlab-runner/config.toml进行修改:1
2
3
4
5
6
7
8
9
10# vi /etc/gitlab-runner/config.toml
concurrent = 1
check_interval = 0
[[runners]]
name = "测试"
url = "http://192.168.1.163/"
token = "5df7f7f10f0e3072f09365379046f1"
executor = "shell"
[runners.cache]
修改完成后,需要重新启动runner:1
# gitlab-runner restart
测试runner
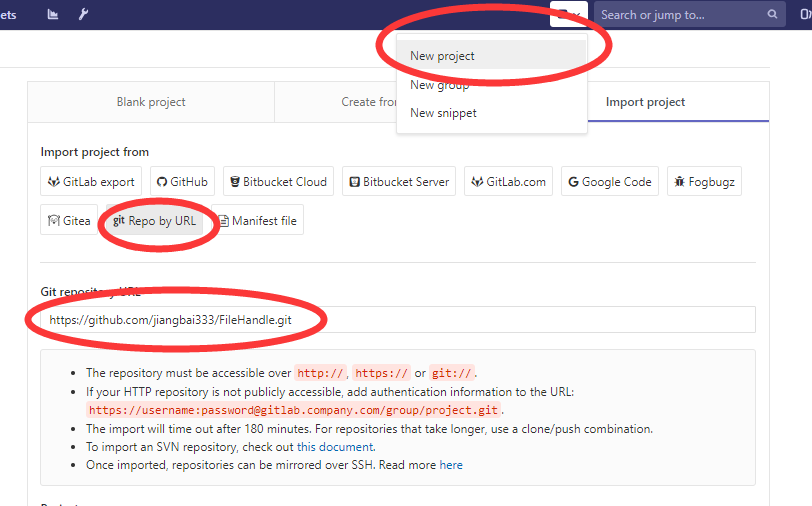
添加项目
首先,为了进行测试,我们需要想gitlab提交一个项目,为了方便起见,直接引入一个github项目,地址为https://github.com/jiangbai333/FileHandle.git:
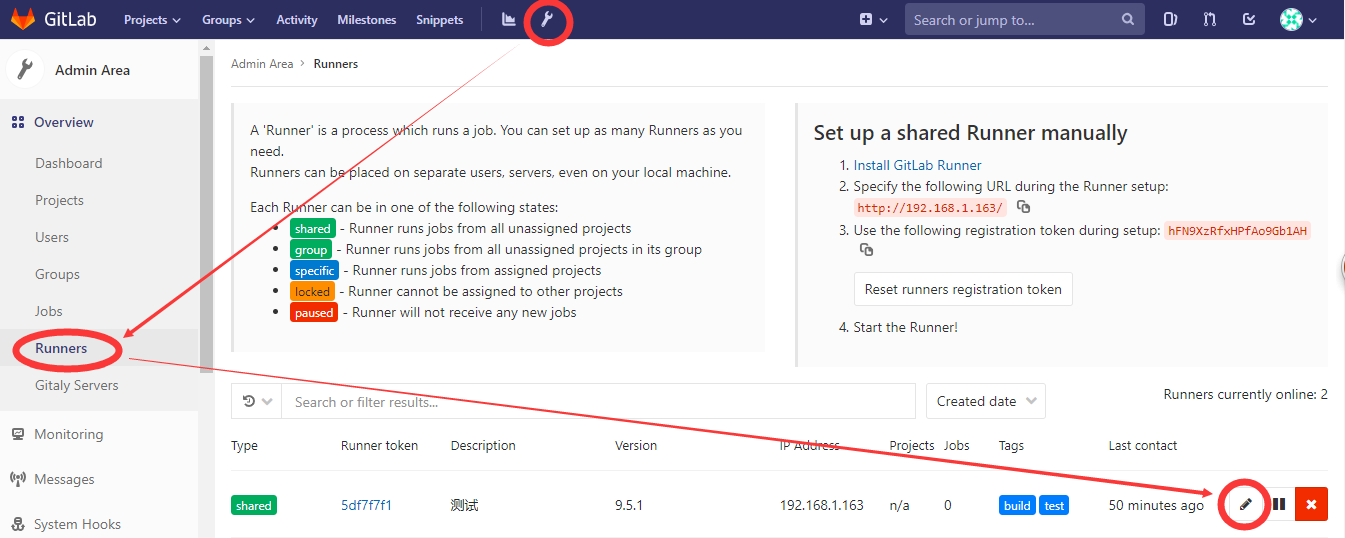
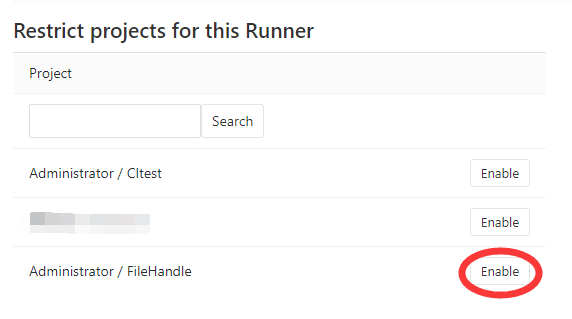
将项目关联到runner中
实际上,每个runner可以关联多个项目,而又可以通过job,限制每个项目的CI流程,因此,建议经可能少建立runner,多使用job。
找到runner,点击“笔”进行编辑
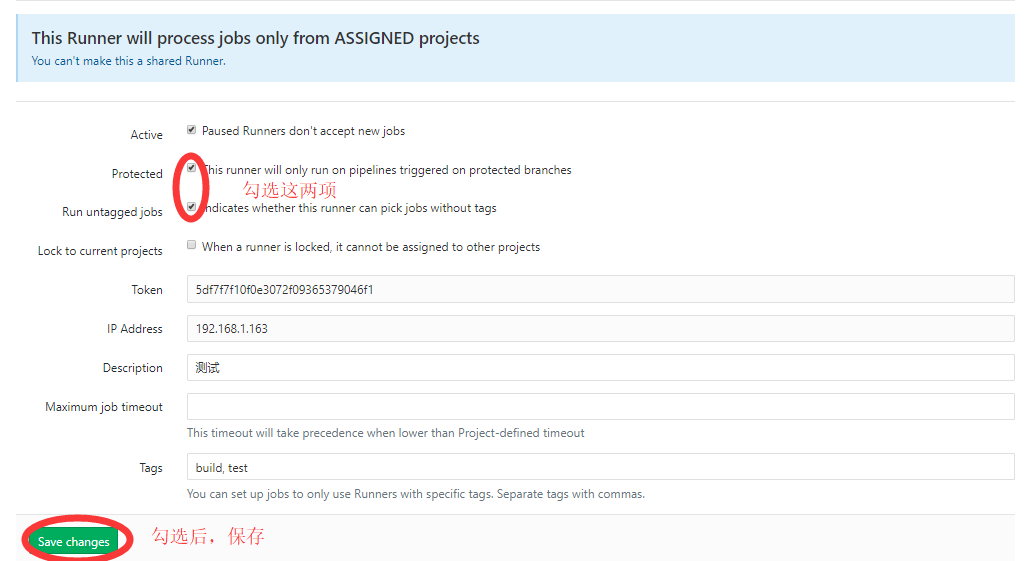
设置runner的运行规则
将项目关联到runner
向项目添加.gitlab-runner.yml
.gitlab-runner.yml相当于CI的描述文件,通过它,可以定制CI的执行步骤。
.gitlab-runner.yml 1
2
3
4
5
6
7stages:
- build
job:
stage: build
script:
- mvn clean
- mvn package
保存提交到项目主分支。
查看job运行结果
由于我们在添加.gitlab-runner.yml之前,已经完成了runner与此项目的关联,因此,保存后,runner将自动执行,你会看到项目主页上有一个“蓝色的月牙”。
它代表当前job的运行状态,当CI成功后,将变为“绿色的对号”,如果失败则会变为“红色X”。我们点击它,会出现提交信息页面,此时,由于构建已经完成并且成功了,因此变成了“绿色的对号”(如果构建步骤较为复杂,很有可能,到这里,还是“蓝色的月牙”)。再次点击它: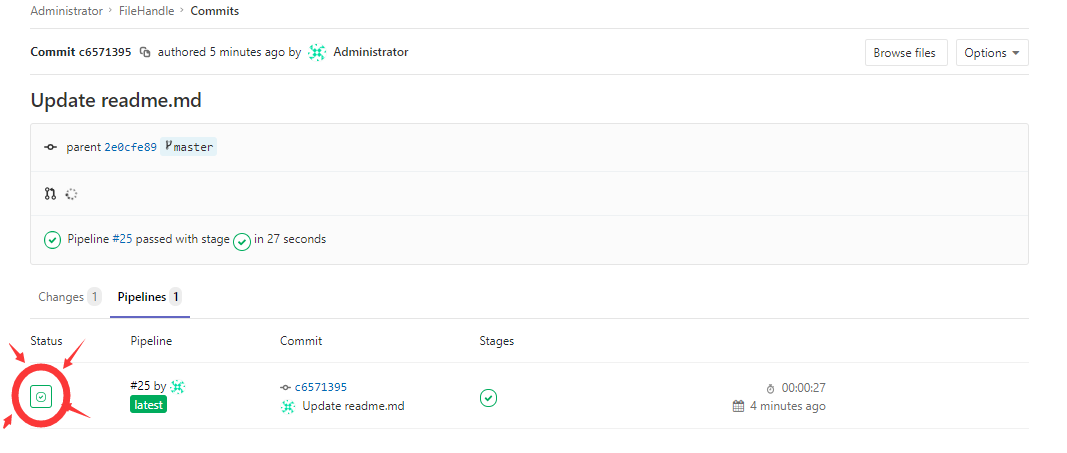
会看到job的状态(当然也是成功),接下来,点击job,查看详细构建信息: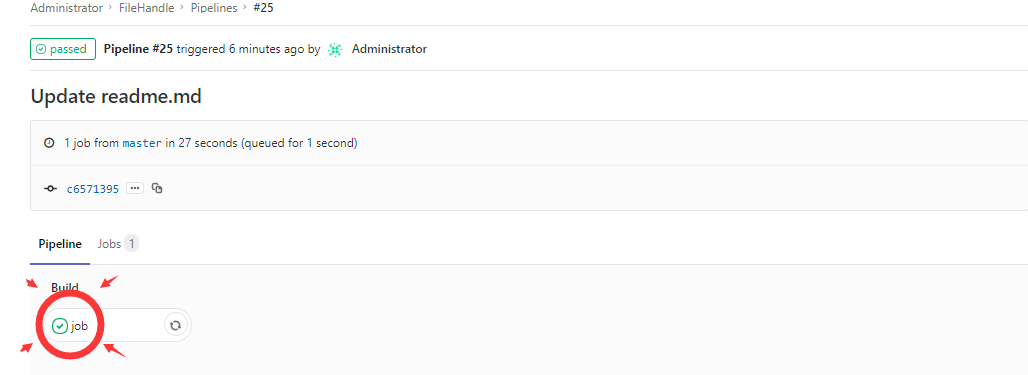
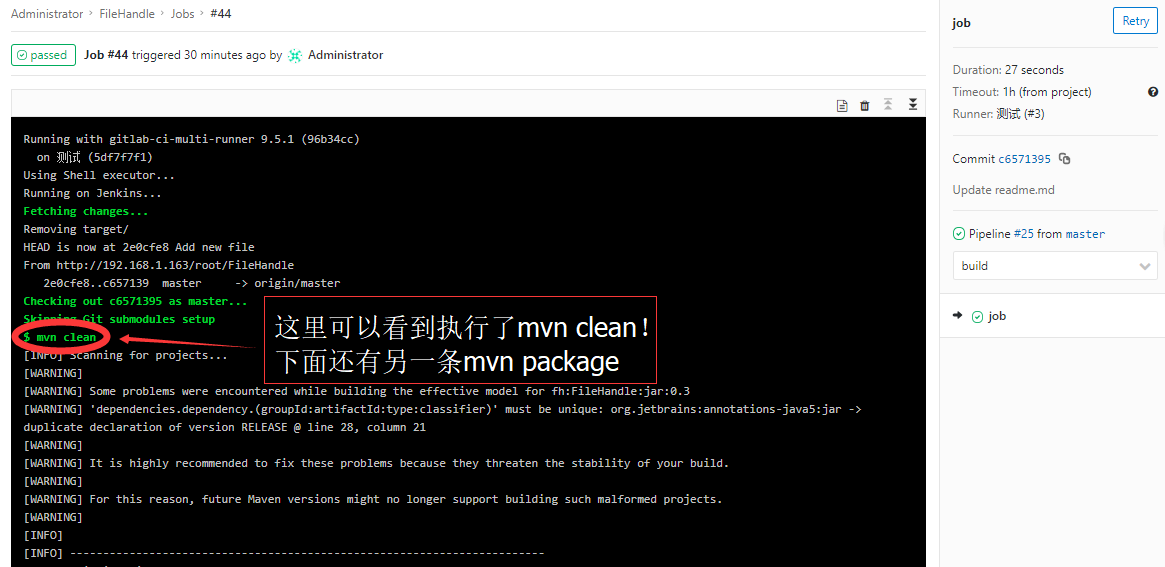
分解job
上面的例子里,你会发现,clean、package两个构建过程存在于一个job中,我们可以尝试将其分离:
.gitlab-runner.yml 1
2
3
4
5
6
7
8
9
10
11stages:
- build
- dev
job:
stage: build
script:
- mvn clean
job1:
stage: dev
script:
- mvn package
提交后,依然会自动进行构建,但是job与job1将会串行执行,job成功后,继续执行job1。最后,将生成两份构建清单。这部分就不上图了,大家可以自己尝试一下。

